Lower Body Foam Rolling Routine
Foam rolling is a flexibility exercise to allow our muscular system to operate efficiently. We have gone through the importance of it a few times on the blog post why it is important to form roll, and an upper body foam rolling routine post. Therefore, I wanted to share a lower body foam rolling routine, for runners, lower body workout days, or for those who have problems with the lower back.
Because alignment is important to prevent injury when foam rolling, with every step place the hands underneath the shoulder. this allows the body to not only balance it self, but blanaces the muscles properly to prevent injury.
IT Band:
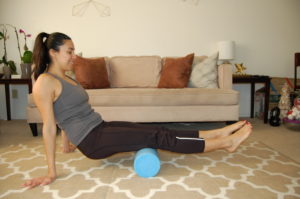
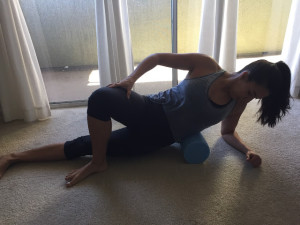
Starting on the right leg, laying on your side, place the foam roll right above the knee, with the other leg behind or in front. Place the right hand or forearm arm on the ground, whichever provides you with more balance. Roll all the way up to your thigh and down to just above the knees. Roll 5 to 7 times and the same on the other side. This is a very tight and tender area for most individuals, so don’t forget to breath!
Hip Flexors:
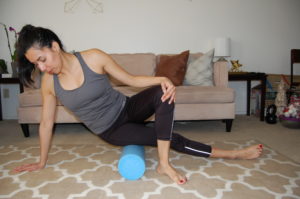
Often a neglected area to foam roll, but a crucial area to prevent injury, is the muscles surrounding the hip. When working on the right side of the IT band, tilt the body another 45 degrees, open the right legs and foam roll on the inside of the leg. It is easier if you use the edge of the foam. Perform 5 to 7 rolls each side and extra 5 small rolls directly below the hip bone.
Quads:
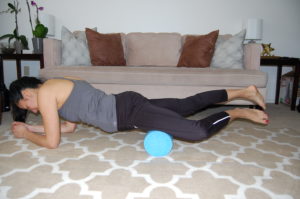
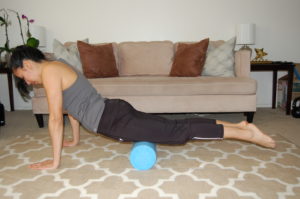
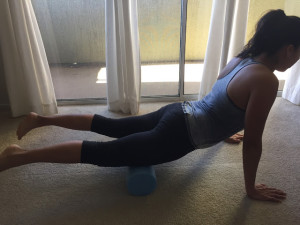
Next rotate the body completely till you are facing the ground. Place the foam roll directly below the hips and place your hand on the ground. Roll through out the entire quad muscle for 10-12 times. On places where it feels tender, stop and sit there for a few seconds, and breath. Because this is a larger muscle, tilt to place pressure on one leg at a time, or even point the toes in and out to hit different areas of the quad muscle.
Glutes:
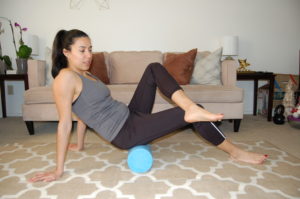
Moving onto the other side of the body, starting with the glutes. We will start on the right glute muscle by sitting on the foam roll and leaning into the right. Cross the right leg over the left leg and left leg can either go straight or foot on the ground. Place the hands on the ground behind the foam roll. Then roll each side 5 to 10 times.
Hamstrings:
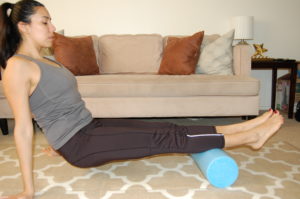
Move the roller down to right above the knee, both legs straight ahead. Because it’s a larger muscle, roll only the bottom portion of the muscles for 10 times and then the top portion for another 10 rolls. Roll a few times pointing the toes outwards to hit the interior hamstring.
Calves:
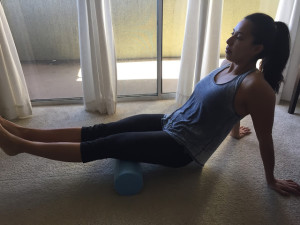
Place the foam roll underneath the calves, and bring your butt up. Perform small rolls through the entire calves, as well as stopping and placing pressure on tender spots. You can even turn the feet out to target the outer calf muscles or face them in to target the interior muscles. Perform 5 rolls through the entire calves feet pointed forwards, 5 with your feet turned out and 5 more feet turned in.
Best to use a lacrosse ball/tennis ball to apply greater pressure to those muscles. Next month will show a routine using a lacrosse ball for muscles that are difficult to work on with the foam roll .
Upper Body Foam Rolling Routine
I have mentioned the importance of foam rolling in this blog post. Therefore, I wanted to share an upper body foam rolling routine. This routine is great to reduce soreness and tension from workouts or from sitting at a desk all day. Foam rolling is like a great message without having paying a cent.
Remember when foam rolling, slow down, relax, and breath. Before each step in the routine, I recommend holding for a few seconds, feeling the pressure of the body against the foam roller. Also do the same for any tender spots found during rolling.
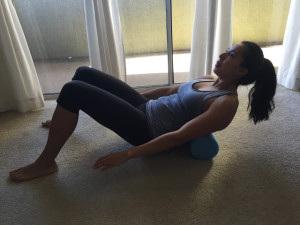
1. Lower Back: Place the foam roller right beneath the hips and hold on to it so that it doesn’t slide out from underneath. Sit there for a second. Then bring arms to the side of the body for balance and bring the knees up, so that they are perpendicular to the ground. Roll gently from side to side. Hitting the tailbone, secrum, and upper glute area. Lean over to one side and stay there for a few seconds and repeat onto the other side.
2. Middle Back: Place the foam roller down to the middle of the back. Bring hands to the side of the head, and sit there for a few seconds. Interlace the hand on the back of your head, bring the hips up and roll the foam roller up and down the back. Roll over slightly to one side, roll, and same for the other.
3. Upper Back: Focus a bit more on the lower trap,turn the foam roller vertically, and lay on it directly. Place hands on the ground for balance. Then make small rolls side to side, leaning into the roller in order to hit the deeper area of the upper, middle part of the back.
4. Shoulders: Turn the foam roller again horizontally, and place over the back, and walk the feet out, till the hips are on the ground. The foam roll should be right, above the shoulder blades. Spread your arms along the side of the head, and roll from side to side. Also move the arms up and down or moving arms if like doing a snow angel.
5. Neck: Place the foam roll behind the neck, look side to side slowly, moving the neck against the roller. Be careful here, because it is delicate area.
6. Lat Muscle (Entire Back): Flipping the body over the side, place the foam roller underneath the armpit, arms above, hips on the ground, and do little rolls vertically. Also, roll slightly body back and forwards, but not onto the ribs. Then do the other side of the body.
7. Chest and Front Shoulder: Place the foam roller at a 45 degree angle, place the between the chest and shoulder blade, body laying on the ground, and begin to roll. Also bring feet up for balance and roll back and forwards, applying pressure where needed. Then do the other side of the body.
How to Best Stretch the Muscles
One type of training we both tend to neglect is flexibility training. I always talk about incorporate it before and after my workouts, and at least do yoga once a week. But so far we have managed to go to yoga about once a month and maybe on the rare occasion foam roll. That’s it! And it should be something we WANT to work on because we both have tight hamstring. The tight hamstring already gives us both knee problems, which can eventually lead to more serious problems.
So I have done research to figure out why it is so important to stretch, besides being flexible, and what is the most optimal way to incorporate flexibility training?
Because we all have imbalances and mobility restrictions, it is important to stretch. Our repetitive movements, incorrect posture, and constant sitting at desk leads to tight muscles. Tight muscle prevents the muscle to perform at its full range of motion, which leads to overuse of compensating muscles and eventually injury.
Here are the many benefit of stretching:
- Greater mobility
- Reduce risk of injury
- Improve joints range of motion
- Increase blood flow
- Increase oxygen levels
- Helps release toxins in the body
- Reduces soreness
- Improves athletic performance
- Better form to build stronger muscles
- Releases tension both body and mind
There are two types of stretching Dynamic Stretching, controlled arm and leg movement at the limit of full range of motion, and Static Stretching forcing the part of body beyond it limit. Both can be done in about 5 minutes and give yourself time for another 5 minutes to foam roll. Here is a how and why foam rolling blog post (here). This is done before and after each workout. Breath out through out every stretch to warm your body from the inside out.
1. Start by flexing, extending and rotating every joint in the body from the neck to the feet/toes.
2. Perform a few neck mobility exercises; flexion/extension, lateral flexion, and rotation
3. Next perform dynamic stretching:
- Shoulder Circles
- Arm Swings
- Side Bends
- Knelling Forearm Stretch
- Standing Hip Circle
- Body-weight Squats
- Side Leg Raises
- Body Weight Lunges
- Ankle and Calves Stretch
If you have a split routine (you separate workouts by body parts) still try doing all the stretches. But even more importantly the body parts that you’ll be working out that day. This could also be done between your sets to optimize time.
4. Next really focus on static stretching every body part at least twice a week. If for really tight muscle best to do every day. Stretch each muscle for at least 1 to 2 minutes, and Don’t Forget to Breath. It should be slightly painful, but not too painful let go. Here are some examples of stretches by the most common muscle group:
Leg Muscles Stretches:
- Standing quadriceps stretch- each leg
- Lying quadriceps stretch- each leg
- Standing hamstring stretch
- Seated forward hamstring stretch- each leg
- Knee to chest glute stretch- each leg
- Seated glute stretch- each leg
- Floor board straight leg stretch
- Seated barbell calve stretch
Back and Chest Stretches:
- Wall Lat stretch
- Flat barbell pull over in stretch position
- Two arm doorway chest stretch
- Dumbbell fly on bench in stretch position
- Trap shrug-in a stretch position
Shoulder Stretches:
- Doorway front deltoid stretch
- Incline front deltoid stretch
- Side deltoid stretch cross chest
- Behind the back side deltoid stretch
Arms Stretches:
- One arm doorway stretch
- Incline dumbbell curls in stretch position
- Overhead triceps stretch
- Old school triceps stretch
Barbell wrist curl in stretch position
The Importance of Foam Rolling
With all the daily stress we put on our body and constant moving around, it’s no wonder our bodies have aches and pains. Especially when we are regularly working out or just as we get older. So what is self-myofascial release (SMR), other wise known as foam rolling and how is it beneficial?
SMR helps with breaking up fascial adhesion (aka knots) that are caused by stressed being placed on muscles. By foam rolling our knots, we are not only relieving those aches and pains, it also:
- allows muscles to perform at the optimal range of motion.
- provides better mobility for tight muscles and restricted joints
- corrects any muscle imbalance
- increases flexibility
- reduces soreness for faster recovery time
Foam rolling should be done before and end of workouts for about 5-10 minutes. Here is some common and larger muscles groups to get started on:
Hamstring
Place hamstrings (back of the leg, above the knee) on the foam roll with hips unsupported. Roll from the knee to the hip while keeping quadriceps tightened.
Quadriceps
Place the quadriceps (front of the leg, above the knee) on the foam roll. Roll from pelvic bone to knee, emphasizing on the outside thigh. Keep the core tight to prevent low back compensations.
Latissimus
Lay on one side placing the foam roller beneath the one side of the latissimus (aka lats) closer to the arm pit. Roll up and down your back, closer to spine (but not directly on the spine) or rock back and forth facing the ceiling. Movement should be minimal in order to keep the foam roll on the lats.
Erector Spiae
Pace your lower back, just above the hips, onto the foam roll. Lean on side of the muscle, so that your spine is not directly placed on the foam roll. With slight movements roll back and forth or up and down. Hold for 30 seconds if feeling tension in one spot.
If your looking for an awesome foam rolling routine, here are some videos from the Tone It Up girls (link).