At Home Resistant Band Glute Workout
Bandz, Bandz, Bandz will make her booty gro! These resistance bands are used as a great tool to used for glute exercise. One because they add resistance to stimulate the muscle (which make muscles grow if done continuously) and second because they are portable. They come in 4-5 resistance level, to increase difficulty as you progress, and are affordable. I bought these on Amazon, for under $5. Because I love to use these when working out my glutes, I will share some of my favorite exercises. These exercises could be done at home, take to the gym or when on travel. Here is an at home glute workout resistant band glute workout.
With all these exercises, place the band above the knees.
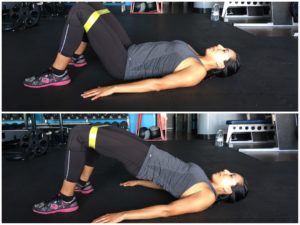
Glute Bridge
Lie on the floor with arms on the side and palms facing up. Bend the hip and knees, with your feet flat on the ground, away from the knee 4 to 6 inches away from your butt. Raise your hips so that you create a straight line from your knees to your shoulder. Then gradually bring the glute down hovering the floor and repeat.
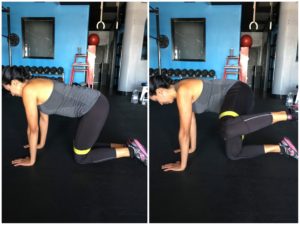
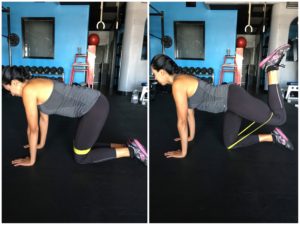
The Fire Hydrant
Kneel down onto the ground, place hands flat on the floor and lock those elbow. You will then bring the right knee up, to the side, were the knee and foot are parallel to the floor and slowly bring it down, and up again with minimal rest. Always make sure the back is straight by gazing forward and tucking in the navel. Repeat on the left leg.
The Kickback
This can exercise can be done on the ground or done standing up. If on the ground, follow the same direction as the fire hydrant, except the foot will kick upwards to the ceiling. If done standing up, find a sturdy spot to hold on to, stand in front of it. Then kick backward with your right leg, squeeze on top, and gradually bring it down. Repeat on the left leg.
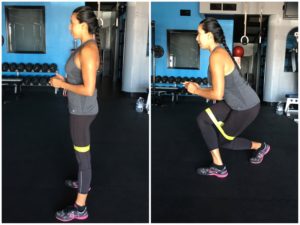
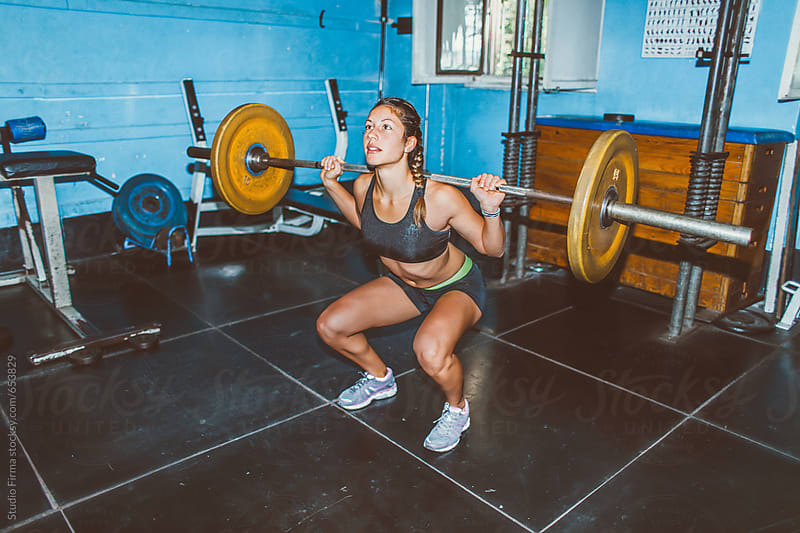
The Deep Squat
A proper squat is done, by standing shoulder width apart with feet a little wider than shoulder-width apart, unlock the hips and send the hips backward as the knees begin to bend. Squat down, till the quads (leg area above the knees) are parallel to the ground. Keep the chest and shoulder stay upright and stare forward. Engage core and, with bodyweight in the heels, explode back up to standing, driving through heels. If doing just the bodyweight, extend arms out straight so they are parallel or cross your arms. If done with weights, hold onto a dumbbell in front.
The Squat Walk
This exercise may take some room, so make space. Follow the same instruction as the squat, but instead of going up, stay squatted. Then take 5 steps to the right side and then five step to the left.
The Courtesy Lunge
Start from standing, feet shoulder width apart, and step your left leg behind the right leg so your thighs cross, bending both knees as if you were curtsying. Make sure your front knee is aligned with your front ankle. Return to standing and switch sides.
10 Minute Bodyweight Workout When Traveling
Do you ever come back from a vacation, relaxed, but wishing you hadn’t gained those few extra pounds? And weight gain is the last thing you want is to stress about after a vacation. So how do we maintain our weight and enjoy our trip?? The key is to incorporate small habits to offset the bad ones. Take a walk, drink water, have a few veggies, and do mini workouts. Everything in moderation, the bad and the good. Therefore we wanted to share a quick, and accessible a 10-minute bodyweight workout when traveling.
Looking at our Instagram, my sister and I love to take mini trips on the weekend and take a longer trip once a year. Which means we do our best to come up with workouts that can be done anywhere. Especially before the day begins or before a big meal to ramp up the metabolism
Warm-up by running in place, jumping jacks and standing toe touches for 1 minutes
Push-ups for 1 minute
Rest 30 seconds
Sit-up with a Russian Twist for 1 minute
Back Lunges with Booty Kick for 1 minute
Rest 1 minute
Skater Lunges with a Twist for 1 minute
Rest 30 Seconds
Superman for 1 minute
Wall Sit for 1 minute
All done with your workout and now time to enjoy!
How to Lift Weights Without Looking Bulky
Let me first start by saying, that just by lifting weights, it’s almost impossible to get bulky. Bodybuilders and crossfitters alike, take years of intense training multiple days a week, personally designed training program, and strict diets to get those muscles. Eating healthy, training 3-5 times a week, will get you results, but will not make you look like an athlete….well maybe if your young and have good genes. Then why do I appear to look bulky after lifting weights? I will share three tips to lift weights without looking bulky.
- Do Not Overeat – Not overeating is probably the most important tip and hard to avoid if you’re not careful. Starting a new training program can ramp up your metabolism and cause your appetite to increase. Plus with the mentality of “I’m working out so I can eat more,” can lead to weight gain. And although it may appear as they are bulking, or think they are gaining weight due to muscles, is just a result of overeating.
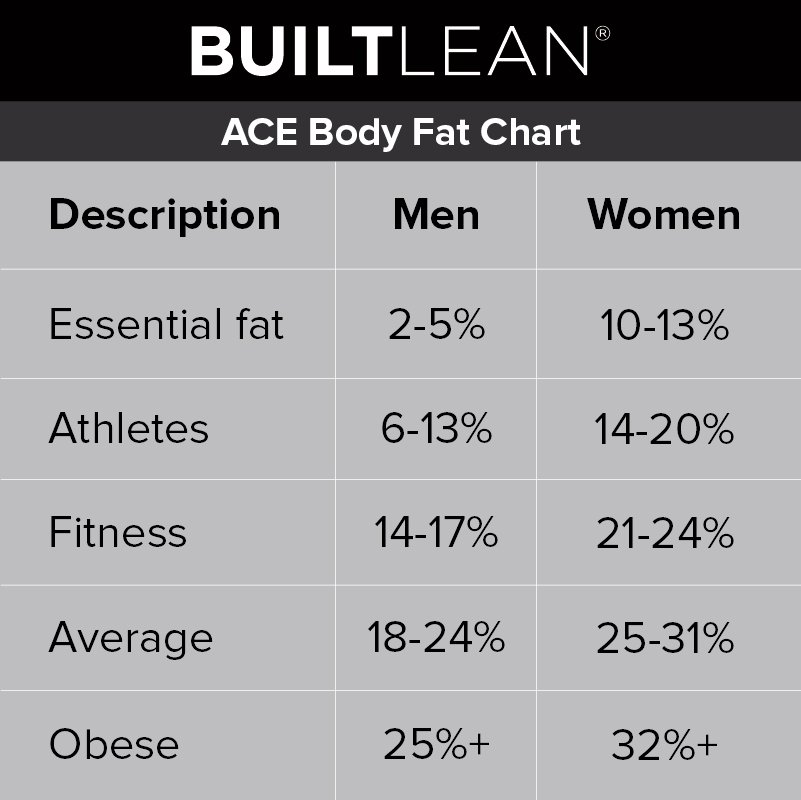
- Trim The Fat – If you want the lean, toned physique, there are two things to keep in mind, one gaining muscles and two trimming fat. The more fat you lose, the more tone or “bulky” you will appear. Which is why bodybuilders try to have a low body fat percentage when competing. Therefore to trim the fat either spend, 75% on weight lifting and 25% on a HITT cardio, or just do circuit training as these do both. Find the balance between these workouts to see ideal results.
- Incorporate Compounds Exercises – To get the most out of your workouts focus on compound workouts, as these help tone the entire body and show faster results. Therefore try to perform 3 sets of 6-10 repetitions of squats, bench press, overhead press, deadlift exercises. Also incorporate bodyweight workouts, such as pull-up and push-ups, as these are also compound exercise. Such as yoga instructors are proof that muscles can be gain by just lifting your own body.
A Weekly Barbell Training Strength Program
Barbell exercises load the body’s normal movement patterns with progressively heavier weights. A process that essentially forces the human body to get stronger. Barbell training is simple, effective, and most importantly proven because:
- The barbell is a very simple tool, so it is easy to learn the basic lifts quickly.
- The weight is fixed and stable, so it’s less likely to deviate from a normal range of motion.
- The unlimited progression because you can always add more weight to the bar.
Which is why it’s a successful strength training foundation for the countless athletes. When instructed correctly, the chance of transforming one’s physique, strength, and confidence, with very little chance of injury, is very possible.
For those in San Diego, check out Undefeated Fitness gym for barbell and strength training.
Here is a three-day barbell training strength program for the week:
A Sculpting Arm Workout and Tips for Beginners
This past weekend, when writing this post, we saw the royal wedding at a morning viewing party (take a look at our instagram for our cheesy tea party) and admiring how beautiful Meghan Markle look. I particularly loved her second look for the reception. Those toned shoulder and arms, looked amazing in the white dress from Stella McCartney. Beautifully sculpted arms are an extra touch to any look. Many people hide their arms, embarrassed they are too loose or too skinny. Regardless, we can do something about it. We can perform sculpting arm workouts to build muscle on the arms.
I wanted to share three tips to working out arms and a workout that incorporates these tips. So get your gym gear on and get started on this sculpting arm workout.
Tip 1: The arms consist of the bicep (as you can imagine that’s TWO muscles, that lie on the top of the arms) and triceps (THREE muscles below the arm.) Best way to incorporate all these muscles is to mix hammer (a neutral or wide grip lifts) and regular bicep curls. For triceps, perform overhead triceps lifts and pulling motions, such as rope pull-downs. Also incorporating single arm exercise to ensure one arm does not compensating for the other.
Tip 2: Unlike the larger muscles, arms don’t need much weight. As the goal for these exercise is not how strong you are, but contracting the muscle properly. Go for 10-15 reps, with a weight that is manageable.
Tip 3: Focus on the form, arms tucked on your side, with elbows facing straight ahead. Fully extend the muscles, and with control, contract the muscle. Letting go of the contraction with the same control as the lift.
This workout is sweet and short, and can be done twice to three times a week, mix with other workouts or alone:
Superset #1
- 12-15 dumbbell bicep curls
- 12-15 dumbbell hammer curls
Superset #1
- 12-13 reps of seated overhead dumbbell
- 15 reps of bench dips
10-12 reps of single arm preacher curls
Superset #3
- 12-15 reps rope triceps straight arm pulldown
- 12-15 reps rope overhead pull-downs
10-12 reps of close grip push-ups (easier drop to knees) with slow four second drop
Running Warm-up Routine for Marathon Training
I’ll admit for a long time, I never put thought into warming-up when preparing for long runs. Because I never got injured or experienced a cramp, I didn’t think it mattered if I warmed-up. Then I read an article on my favorite blog Cupcake and Cashmere, on how Alicia injured herself for not warming up before runs. Since I was preparing for a marathon, I needed to incorporate a warm-up routine, before I got injured. After doing a wide research on proper running warm-up routine, and seeing what was bothering me after runs, I began putting one in place.
Here are the areas I focused on:
- Joints and smaller muscles stretches, since these are used less frequent and easier to injure.
- Hip flexors stretches,as they are normally limited in its range of motion and are typically tight. Tightness in these muscles can lead from lower back pain to other indirect injuries.
- Dynamic stretching, which is stretching that mimics the same range of motion as the exercise you’ll be performing.
A warm-up routine should take between 10-15 minutes, as we don’t want to utilize time from running. Click the links on each exercise for videos.
- Start with a 5 minute run at 50% of your normal speed. This will get the lungs working, blood circulating, and wake up the muscles.
- 10 air squats, as this is a compound exercise that will warm-up the entire lower body muscles.
- Perform 10 front and back leg swings and then side to side leg swings on each leg. If your balance is not great (like mine), hold on to a wall or a railing. Perform 10 of each exercise on both legs.
- 10 single calf raises. By lifting one knee up in front of you and with the other leg raise to you toes. Hold for 3 seconds and slowly lower the foot. This warms up the plantar fasciitis muscles that can easily injured due with intensive stress…I should know…as I got this injury before I knew this was important
- Take 10 walking figure four steps alternating each leg. Start by landing on one leg, lift the foot of the opposite leg toward the middle of your body. Then grasp your knee and foot, and pull toward your chest until a stretch is felt through the glutes. Keep head and chest upright. Hold stretch for 1-2 seconds. Alternate legs as you walk forward.
- Perform three 30 second lunge stretch on each leg. Place one knee on the ground, and the other bent in front of you. Leaning the body towards the front foot (without by passing the knee), stretch the hip and groin. Hold for 30 seconds and alternate to the next leg.
-Danni
Sculpting Back and Bicep Weightlifting Workout
I always enjoy looking at Youtube videos and Instagram for inspiration and workout ideas. It pushes me to switch up my usual workouts and work on different muscles. Especially for the back and biceps muscles, where there are countless exercise for these muscle groups. However every now and then, I go back to the classic exercises. These are the exercise, if done correct, have sculpted and shape bodies in bodybuilding for years.
Here is a sculpting back and bicep weightlifting workout to add to your workout routine:
1) Wide Grip Lat Pull-down – 2 warm-up sets of 5-8 reps and 3 working sets of 8 repetitions
2) Superset: 4 sets of 8-10 repetitions
3) Assisted Chin-ups – 3 sets of 10 repetitions
4) Super-set: 3 sets of 10-12 repetitions
Straight Arm Dumbbell Pull-over
Alternating Dumbbell Bicep Curl
5) Seated Cable Row – 2 dropset to failure (start with 3 rep max and keep dropping weight till no longer cable of pulling)
6) Super-set: 3 sets of 10-12 repetitions
Alternating Standing Close-Grip and Wide Grip Barbell Curl
For a full weight loss and workout routine, check out this blog post.
Weightloss and Body Shaping Workout Schedule
Exercise keeps the body’s muscular, skeletal and nervous system running smoothly, but aids with weight loss, increase energy, and fat loss. Which let be honest is the only reason most people do it. While weight loss while 80% based on diet, a great weight routine increases metabolism to burn calories even when you’re not working out. Also incorporating cardio, for heart health, and flexibility training, to keep the muscles from feeling over worked. Here is a simple weight loss and body shaping workout.
Monday:
Cardio – Low intense 10-30 minutes before weight lifting and 10-30 HITT afterwards. Here are our three top HITT cardio workout for examples.
Back and Bicep Workout- Here are three training videos Kathleen Tesori back and Bis Workout, BB Bikini Back and Bicep Workout, and Katie Corio Back and Bicep Workout.
Tuesday:
Cardio – Low intense 10-30 minutes before weight lifting and 10-30 HITT afterwards
Leg Workout – Here are three training videos Ashley Horner Strong Leg Workout, Superset Your Way to Super Leg, and Toning Leg Workout.
Wednesday:
Take a light yoga class or try out any of these three videos.
Thursday:
Rest Day
Friday:
Cardio – Low intense 10-30 minutes before weight lifting and 10-30 HITT afterwards
Shoulder and Arm Workout – Here are three training videos Jen Heward Shoulda Workout, Shoulder and Arm Weight Workout, and Katie Corio Amazing Shoulder and Arm Workout.
Saturday:
Long steady cardio session for 60 to 90 minutes. Great options are a spin class, long run outdoors, a hike, or any cardio machine.
Sunday:
Rest Day
Our 10 Must Have for a Marathon
With our first marathon in the horizon, we have been performing long runs on a weekly basis. Therefore here are our 10 must have items to have with us for long runs, no matter what.
- Advil- Taken before a run reduces muscles inflammation and relives pain from joint. Also not as toxic to the liver, as most pain medication.
- Water Bottles – Either a hand held bottle or waist band are great to have whenever your need of water. While during events there are water stations, I need it during my training.
- Face Wipes – After a long run, your face is salty and dry. So I always have it ready so I can start feeling refresh.
- Lacrosse Balls & Foam Roller – Pre and post run, it’s great to massage and remove knots from muscle. I use the lacrosse ball to roll the bottom of knees and ankles to relieve joint pain caused by overuse.
- Sun Block – With the sun beating down at you for hours, this is a necessity. I look for SPF with titanium oxide.
- Band aids and Cream – Used to help avoid blisters or chafing caused by the sweat and friction.
- Hairbands – A good hair band is a must because know one wants their hair on the face during any exercise.
- Electrolytes – Coconut water, sports drinks, or other supplements helps replenish electrolytes. Lack of electrolytes causes problems with heart beating, blood pressure, breathing, and performance.
- Running playlist – A great playlist with upbeat songs is what keeps in a good mindset.
- Running Outfit – With long runs the right clothes and shoes are important. Clothes must be breathable, fit right, and shoes have the right support. These outfits (link) are some ideas to wear.
- 1
- 2
- 3
- …
- 5
- Next Page »